Exercise Profile
Target Muscle Group:
- Primary: Gluteus Maximus (Glutes)
- Secondary: Hamstrings, Core Stabilizers, Erector Spinae
Exercise Type:
- Strength Training / Hypertrophy
Equipment Required:
- Exercise Mat (optional)
- Resistance Band or Barbell (for weighted progression)
Mechanics:
- Compound (Multi-Joint Exercise – Hip Extension)
Force Type:
- Push (Concentric & Eccentric Phases)
Experience Level:
- All Levels (Beginner to Advanced)
Best For:
- Glute Activation, Hip Strength, Lower Back Health
Common Risks:
- Lower Back Strain (if over-arching the spine)
Overview
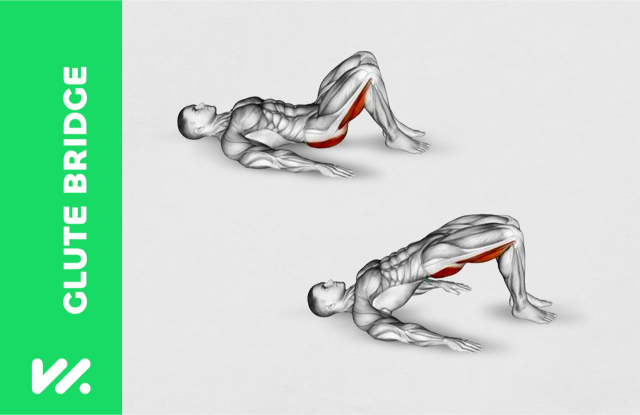
The Glute Bridge is a foundational exercise for building stronger, more powerful glutes while improving hip mobility and core stability. By isolating the gluteus maximus, it corrects muscle imbalances caused by prolonged sitting and enhances performance in running, jumping, and squatting movements. This bodyweight exercise is ideal for rehab, prehab, or athletic training, offering scalable intensity for all fitness levels.
Exercise Instructions
Step-by-Step Form:
- Setup:
- Lie on your back with knees bent, feet flat on the floor hip-width apart.
- Arms relaxed at your sides, palms facing down.
- Lifting Phase:
- Press through your heels, engaging your glutes to lift your hips toward the ceiling.
- Form a straight line from shoulders to knees at the top.
- Peak Contraction:
- Squeeze your glutes tightly for 1–2 seconds.
- Lowering Phase:
- Slowly lower your hips back to the starting position without touching the floor.
- Repetitions:
- Perform 3–4 sets of 12–20 reps for hypertrophy or 8–12 reps with added weight for strength.
Professional Tips
Maximize Results:
- Mind-Muscle Connection: Focus on “pushing the floor away” with your heels to engage glutes, not hamstrings.
- Tempo: Use a 2-second lift, 1-second squeeze, and 3-second lower.
- Progression:
- Place a resistance band above your knees to engage glutes further.
- Add a barbell or weight plate across your hips for overload.
Avoid Common Mistakes:
- Overarching the Spine: Keep ribs down to protect your lower back.
- Knees Caving In: Push knees outward to align with toes.
- Rushing Reps: Prioritize control over speed.
Advanced Variations:
- Single-Leg Glute Bridge: Lift one leg off the ground for unilateral strength.
- Elevated Glute Bridge: Place feet on a bench or step for increased range of motion.
- Marching Glute Bridge: Alternate lifting legs while maintaining hip height.
Benefits of the Glute Bridge
- Postural Improvement: Counters tight hip flexors from sitting.
- Injury Prevention: Strengthens the posterior chain to protect knees and lower back.
- Functional Power: Boosts explosiveness for sports like sprinting and cycling.
Variations & Alternatives
- Hip Thrust: Performed with shoulders elevated on a bench for greater glute activation.
- Frog Bridge: Heels together, knees out (butterfly position) to emphasize glute medius.
- Weighted Glute Bridge: Add a dumbbell, barbell, or sandbag for resistance.
- Stability Ball Glute Bridge: Place feet on a ball to engage core and hamstrings.
Incorporate this exercise into Leg Day Workouts, Post-Activation Warm-Ups, or Rehab Programs for maximum benefits!